応用情報技術者試験
今日はUnityの話題ではなく、応用情報技術者試験の話です。
と言うのも、今日6/19が平成27年度春期の合格発表日だからです。
皆さん、結果は如何でしたでしょうか?
午後問、結構難しかったですよね。
応用情報技術者試験って?
www.jitec.ipa.go.jp
IPAが開催している国家資格です。2008年まではソフトウェア開発技術者試験という名前でした。
システム関係の会社に勤めている人は、取るように言われているのではないでしょうか。
私の場合は、データベース管理を主業務としていますが、特に取れという指示はなく、「一応取っとくか」という感じで受けました。
結果
私の結果はと言うと、
合格
でした。
自己採点では午後が58点だったので、結構運頼みかなと思っていたのですが、意外と高得点をとれました。
ちなみに午前が75点、午後も75点でした。
今回がはじめての受験だったので、午後問は、見た瞬間冷や汗をかいたのを覚えていますが、ちょっとシステムをかじったことのある人にとっては基本的に国語の問題なので、よく読めば大丈夫な問題でした。
勉強法
会社で仲間(2人。どちらも受験経験なし)を巻き込んで勉強会をやりました。
試験に出る範囲を試験要綱で確認し、22項目に分けて、3人で担当を割り振り(一人7項目担当)、各自が担当の分を3週間の間に勉強し、週に1回2時間掛けて他の2人に教えました。
ですから一人あたりの勉強時間は(人によりますが)7項目*5時間+22項目*2時間=79時間ぐらいです。
期間は5ヶ月ぐらい掛かりましたが、それぞれの負荷はそれ程高くなかったと思います。(巷では400時間ぐらい勉強しないと合格は無理とか書いてあります。400時間もこんな事に使うぐらいだったら、プログラムの1本でも書いた方が良いです)
そもそものターゲットとしては、午前午後どちらも60点以上取るという風に決めていたので、必要最低限の勉強しかしませんでした。
参考資料

やさしい 応用情報技術者 講座 2015年版 (やさしい講座シリーズ)
- 作者: 高橋麻奈
- 出版社/メーカー: SBクリエイティブ
- 発売日: 2014/11/26
- メディア: 大型本
- この商品を含むブログを見る

情報処理教科書 応用情報技術者 テキスト&問題集 2015年版
- 作者: 日高哲郎
- 出版社/メーカー: 翔泳社
- 発売日: 2014/11/22
- メディア: 単行本(ソフトカバー)
- この商品を含むブログを見る
どちらかと言うと、Google先生やWikipedia先生に聞いて、PPTに纏め上げていました。
まとめ
今、他の2人からの合格発表待ちですが、1人は合格していたとの事で、多分もう1人も大丈夫じゃないかなと思っています。(私が記憶していた受験番号が合格者リストにあったので)
1人で勉強していてなかなか合格できないでいる人は、一度仲間を巻き込んでみては如何でしょうか?
他の人の合否がかかってくるので、結構真剣に勉強することが出来ますよ!
Unityで2DRPGを作ってみる 4日目
忙しくて長らくUnityを触れていなかったのですが、前の記事から半年経ってるので何か書かねばと思い立ちました。
3日目まではUnity4.6で作っていたのですが、昨日Unityのサイトを見ていたら、Unity5.0.2ってのが出てたので早速ダウンロードして使ってみました。
4.6との違い
正直まだ良くわかっていませんw
ただ、1日目に作ったクラス
kotonaga.hatenablog.com
がエラー出まくりになりましたw
問題の確認
UnityEditorInternal関係のクラスが殆ど(全部?)obsoleteになっていました。
代わりにUnityEditor.Animationsを使えってことなので、それを使うことにしました。
プログラムの変更
何か色々苦労したのでもはや覚えていないのですが、UnityEditor.Animationsの中のクラスが、前のUnityEditorInternalのクラスと名前が同じでも使い方が違ったり、メソッドが異なる等で結構書き換えました。
こんな感じ
/*
The MIT License (MIT)

Copyright (c) 2015 Kotonaga

Permission is hereby granted, free of charge, to any person obtaining a copy
of this software and associated documentation files (the "Software"), to deal
in the Software without restriction, including without limitation the rights
to use, copy, modify, merge, publish, distribute, sublicense, and/or sell
copies of the Software, and to permit persons to whom the Software is
furnished to do so, subject to the following conditions:

The above copyright notice and this permission notice shall be included in
all copies or substantial portions of the Software.

THE SOFTWARE IS PROVIDED "AS IS", WITHOUT WARRANTY OF ANY KIND, EXPRESS OR
IMPLIED, INCLUDING BUT NOT LIMITED TO THE WARRANTIES OF MERCHANTABILITY,
FITNESS FOR A PARTICULAR PURPOSE AND NONINFRINGEMENT. IN NO EVENT SHALL THE
AUTHORS OR COPYRIGHT HOLDERS BE LIABLE FOR ANY CLAIM, DAMAGES OR OTHER
LIABILITY, WHETHER IN AN ACTION OF CONTRACT, TORT OR OTHERWISE, ARISING FROM,
OUT OF OR IN CONNECTION WITH THE SOFTWARE OR THE USE OR OTHER DEALINGS IN
THE SOFTWARE.
*/

#if UNITY_EDITOR
using UnityEngine;
using UnityEditor;
using UnityEditor.Animations;

[ExecuteInEditMode()]
public class Character : MonoBehaviour
{
    ///
    /// ウディタ用キャラクタ画像素材
    ///
    public Texture2D m_image;
    ///
    ///  1セルの幅
    ///
    public int m_cropWidth;
    ///
    /// 1セルの高さ
    ///
    public int m_cropHeight;

    void Awake ()
    {
        if(this.m_image==null)
            return;

        // スプライトレンダラの取得
        SpriteRenderer spriteRenderer = gameObject.GetComponent ();
        // アニメータの取得
        Animator animator = gameObject.GetComponent ();
        // ぼやけを除去
        this.m_image.filterMode = FilterMode.Point;

        // 15フレームに一回アニメーションする
        float frameLength = 15f / 60f;
        // 画像は横にアニメーションする
        int frameCount = this.m_image.width / this.m_cropWidth;
        // 画像は縦に種類が並んでいる
        int stateCount = this.m_image.height / this.m_cropHeight;
        bool extendedCharaChipSet = false;

        // ただし、8方向のチップセットが存在するので、それに対処する
        if(frameCount==6 || frameCount==10){
            frameCount >>= 1;
            stateCount <<= 1;
            extendedCharaChipSet = true;
        }

        // スプライト配列の作成
        Sprite[,] sprites = new Sprite[stateCount, frameCount];

        // Blend Tree 設定用のVector2配列の準備
        Vector2[] positions = {
            new Vector2(0, 1),
            new Vector2(1, 0),
            new Vector2(-1, 0),
            new Vector2(0, -1),
            new Vector2(1, 1),
            new Vector2(-1, 1),
            new Vector2(1, -1),
            new Vector2(-1, -1),
        };

        // アニメータコントローラの作成
        AnimatorController animatorController = new AnimatorController ();
        // 名前はテクスチャ名にする
        animatorController.name = this.m_image.name;
        //向きと状態指定用のパラメータを追加
        animatorController.AddParameter ("DirectionX", AnimatorControllerParameterType.Float);
        animatorController.AddParameter ("DirectionY", AnimatorControllerParameterType.Float);
        animatorController.AddParameter ("Walking", AnimatorControllerParameterType.Bool);

        // アニメータコントローラにベースレイヤを追加
        animatorController.AddLayer ("Base");
        // 歩き状態を追加する
        BlendTree walkBlendTree;
        AnimatorState walkState =  animatorController.CreateBlendTreeInController("Walk", out walkBlendTree);
        walkBlendTree.name = "Blend Tree";

        // 歩き状態は歩く方向によってアニメーションが変化する
        walkBlendTree.blendType = BlendTreeType.SimpleDirectional2D;
        walkBlendTree.blendParameter = "DirectionX";
        walkBlendTree.blendParameterY = "DirectionY";

        // 状態の数だけループ
        for (int y=0; y=(stateCount>>1)){
                offsetX = frameCount;
                offsetY = -(stateCount>>1);
            }
            // スプライトの切り出しと普通のアニメーションの作成
            for (int x=0; x1枚目とアニメーションする
            for (int x=1; x>=0; x--)
            {
                int index = frameCount + 1 -x;
                keyFrames [index] = new ObjectReferenceKeyframe{time=index*frameLength, value=sprites[y,x]};
            }

            // アニメーションクリップの作成
            // 名前は状態のインデックスにする
            AnimationClip clip = new AnimationClip ();
            clip.name = y.ToString ();
            // はみ出た部分は消す
            clip.wrapMode = WrapMode.Clamp;
            // カーブの作成
            EditorCurveBinding curveBinding = new EditorCurveBinding ();
            // ファイルは存在しない
            curveBinding.path = string.Empty;
            // スプライトをアニメーションするのでtypeにSpriteRenderer
            // propertyNameにはm_Spriteを指定
            curveBinding.type = typeof(SpriteRenderer);
            curveBinding.propertyName = "m_Sprite";
            // クリップとカーブにキーフレームをバインド
            AnimationUtility.SetObjectReferenceCurve (clip, curveBinding, keyFrames);
            // LoopTimeが直接設定出来ないので一旦シリアライズする
            SerializedObject serializedClip = new SerializedObject (clip);
            // アニメーションクリップ設定の取り出し
            AnimationClipSettings animationClipSettings = new AnimationClipSettings (serializedClip.FindProperty ("m_AnimationClipSettings"));
            // LoopTimeを有効にする
            animationClipSettings.LoopTime = true;
            // 設定を書き戻す
            serializedClip.ApplyModifiedProperties ();
            // 状態を歩き状態のブレンドツリーに追加
            walkBlendTree.AddChild (clip, positions[y]);
        }

        // 止まり状態を追加する
        BlendTree waitBlendTree;
        AnimatorState waitState =  animatorController.CreateBlendTreeInController("Wait", out waitBlendTree);
        waitBlendTree.name = "Blend Tree";

        // 止まり状態はアニメーションしないが
        // 方向によってスプライトが変化する
        waitBlendTree.blendType = BlendTreeType.SimpleDirectional2D;
        waitBlendTree.blendParameter = "DirectionX";
        waitBlendTree.blendParameterY = "DirectionY";

        // 状態の数だけループ
        for (int i=0; i歩きのトランジションを作成
        AnimatorStateTransition waitToWalk = waitState.AddTransition(walkState);
        // Walkingフラグがtrueの時
        waitToWalk.AddCondition(AnimatorConditionMode.If,0,"Walking");

        // 歩き->止まりのトランジションを作成
        AnimatorStateTransition walkToWait = walkState.AddTransition(waitState);
        // Walkingフラグがfalseの時
        walkToWait.AddCondition(AnimatorConditionMode.IfNot,0,"Walking");

        // アニメータコントローラに設定
        animator.runtimeAnimatorController = (animatorController as RuntimeAnimatorController);

        // とりあえず0,0のスプライトをデフォルトにセット
        spriteRenderer.sprite = sprites[0,0];
    }
}

///
/// AnimationClipSettingsの設定用クラス
///
class AnimationClipSettings
{
    SerializedProperty m_property;

    public AnimationClipSettings (SerializedProperty prop)
    {
        this.m_property = prop;
    }

    private SerializedProperty Get (string property)
    {
        return this.m_property.FindPropertyRelative (property);
    }

    public bool LoopTime
    {
        get
        {
            return this.Get ("m_LoopTime").boolValue;
        }
        set
        {
            this.Get ("m_LoopTime").boolValue = value;
        }
    }
}
#endif
まとめ
変更点はまだ良く分かっていません。
とりあえずこのクラスだけ直したら、他は前のままで動くようになりました。
フィールドマップを早く実装したい所ですが、まだ出来ていません…
Unityで2DRPGを作ってみる 3日目
昨日までのところで、キャラクターの見た目のところは出来たので、今日はインプット関連のスクリプトを書いていきます。
それだけだとすぐ終わってしまうので、適当に歩き回る村人も作ります。
CharacterControlの作成
プレイヤーと村人で共通の処理があるので、CharacterControlというクラスを作り、プレイヤーと村人はそれを継承する形にします。
CharacterControl.cs
/*
The MIT License (MIT)

Copyright (c) 2014 Kotonaga

Permission is hereby granted, free of charge, to any person obtaining a copy
of this software and associated documentation files (the "Software"), to deal
in the Software without restriction, including without limitation the rights
to use, copy, modify, merge, publish, distribute, sublicense, and/or sell
copies of the Software, and to permit persons to whom the Software is
furnished to do so, subject to the following conditions:

The above copyright notice and this permission notice shall be included in
all copies or substantial portions of the Software.

THE SOFTWARE IS PROVIDED "AS IS", WITHOUT WARRANTY OF ANY KIND, EXPRESS OR
IMPLIED, INCLUDING BUT NOT LIMITED TO THE WARRANTIES OF MERCHANTABILITY,
FITNESS FOR A PARTICULAR PURPOSE AND NONINFRINGEMENT. IN NO EVENT SHALL THE
AUTHORS OR COPYRIGHT HOLDERS BE LIABLE FOR ANY CLAIM, DAMAGES OR OTHER
LIABILITY, WHETHER IN AN ACTION OF CONTRACT, TORT OR OTHERWISE, ARISING FROM,
OUT OF OR IN CONNECTION WITH THE SOFTWARE OR THE USE OR OTHER DEALINGS IN
THE SOFTWARE.
*/

using UnityEngine;

public class CharacterControl : MonoBehaviour {
    public float m_speed;
    protected Animator m_animator;
    protected float m_directionX = 0;
    protected float m_directionY = 0;
    protected bool m_walking = false;

    protected void Awake() {
        this.m_animator = GetComponent();
    }

    protected void Update () {
        if(this.m_animator){
            if(this.m_walking){
                transform.Translate(new Vector3(this.m_directionX, this.m_directionY, 0) * Time.deltaTime * m_speed);
                transform.position = new Vector3(transform.position.x,transform.position.y,transform.position.y / 1000f);
            }
            this.m_animator.SetFloat("DirectionX", this.m_directionX);
            this.m_animator.SetFloat("DirectionY", this.m_directionY);
            this.m_animator.SetBool("Walking", this.m_walking);
        }
    }
}
PlayerControlの作成
Unityには、Inputクラスというのがあり、これを使うとインプット関係のコーディングが非常に楽です。
Input.GetAxisに、"Horizontal"を入れるとX軸の入力が、"Vertical"を入れるとY軸の入力が分かります。
この値を利用するPlayerControlクラスを作成します。
PlayerControl.cs
/*
The MIT License (MIT)

Copyright (c) 2014 Kotonaga

Permission is hereby granted, free of charge, to any person obtaining a copy
of this software and associated documentation files (the "Software"), to deal
in the Software without restriction, including without limitation the rights
to use, copy, modify, merge, publish, distribute, sublicense, and/or sell
copies of the Software, and to permit persons to whom the Software is
furnished to do so, subject to the following conditions:

The above copyright notice and this permission notice shall be included in
all copies or substantial portions of the Software.

THE SOFTWARE IS PROVIDED "AS IS", WITHOUT WARRANTY OF ANY KIND, EXPRESS OR
IMPLIED, INCLUDING BUT NOT LIMITED TO THE WARRANTIES OF MERCHANTABILITY,
FITNESS FOR A PARTICULAR PURPOSE AND NONINFRINGEMENT. IN NO EVENT SHALL THE
AUTHORS OR COPYRIGHT HOLDERS BE LIABLE FOR ANY CLAIM, DAMAGES OR OTHER
LIABILITY, WHETHER IN AN ACTION OF CONTRACT, TORT OR OTHERWISE, ARISING FROM,
OUT OF OR IN CONNECTION WITH THE SOFTWARE OR THE USE OR OTHER DEALINGS IN
THE SOFTWARE.
*/

using UnityEngine;

public class PlayerControl : CharacterControl {
    new void Update () {
        if(this.m_animator){
            // 入力の取得
            float horizontal = Input.GetAxis("Horizontal");
            float vertical = Input.GetAxis("Vertical");

            this.m_walking = true;

            if(horizontal==0 && vertical==0){
                this.m_walking = false;
            }else{
                this.m_directionX = horizontal;
                this.m_directionY = vertical;
            }
        }
        base.Update();
    }
}
VillagerControlの作成
次に村人を作りますが、その前に昨日作成したGameObjectの名前をCharacterBaseに変更し、Prefabとして保存します。

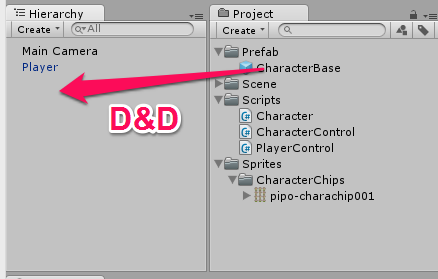
それから、HierarchyのCharacterBaseの名前をPlayerに変更し、CharacterBaseをPrefabからHierarchyにD&Dします。

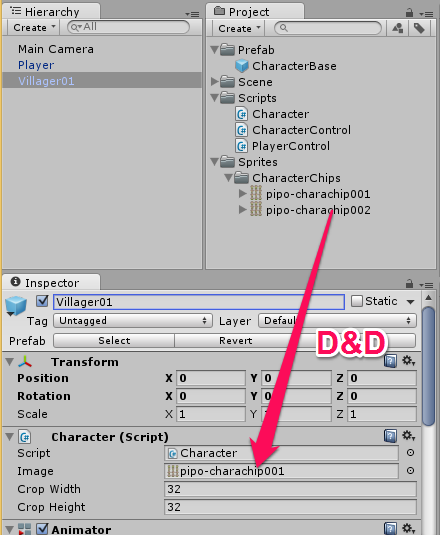
新しく出来たCharacterBaseの名前をVillager01にします。キャラクタの画像はデフォルトでpipo-charachip001になっているので、Villager01のCharacterスクリプトのImageを、pipo-charachip002などに変更します。

この村人に設定するスクリプトを作成します。
VillagerControl.cs
/*
The MIT License (MIT)

Copyright (c) 2014 Kotonaga

Permission is hereby granted, free of charge, to any person obtaining a copy
of this software and associated documentation files (the "Software"), to deal
in the Software without restriction, including without limitation the rights
to use, copy, modify, merge, publish, distribute, sublicense, and/or sell
copies of the Software, and to permit persons to whom the Software is
furnished to do so, subject to the following conditions:

The above copyright notice and this permission notice shall be included in
all copies or substantial portions of the Software.

THE SOFTWARE IS PROVIDED "AS IS", WITHOUT WARRANTY OF ANY KIND, EXPRESS OR
IMPLIED, INCLUDING BUT NOT LIMITED TO THE WARRANTIES OF MERCHANTABILITY,
FITNESS FOR A PARTICULAR PURPOSE AND NONINFRINGEMENT. IN NO EVENT SHALL THE
AUTHORS OR COPYRIGHT HOLDERS BE LIABLE FOR ANY CLAIM, DAMAGES OR OTHER
LIABILITY, WHETHER IN AN ACTION OF CONTRACT, TORT OR OTHERWISE, ARISING FROM,
OUT OF OR IN CONNECTION WITH THE SOFTWARE OR THE USE OR OTHER DEALINGS IN
THE SOFTWARE.
*/

using UnityEngine;
using System.Collections;

public class VillagerControl : CharacterControl {
    private float m_defaultSpeed;

    void Start () {
        this.m_defaultSpeed = this.m_speed;
        StartCoroutine("Walk");
    }

    private IEnumerator Walk(){
        for(;;){
            this.m_walking = true;
            this.m_speed = this.m_defaultSpeed * Random.Range (0.5f,1f);
            this.m_directionX = Random.Range (-1f,1f);
            this.m_directionY = Random.Range (-1f,1f);
            yield return new WaitForSeconds(Random.Range(0f,5f));
            this.Wait();
            yield return new WaitForSeconds(Random.Range(0f,5f));
        }
    }

    private void Wait(){
        this.m_walking = false;
    }
}
村人の動きとしては、ランダムに移動量と移動方向を決めて、0~5秒間でランダムに移動し、0~5秒間をランダムに停止すると言うのを繰り返します。
こういう動作はイテレータを使用したコルーチンを使うことで実現できます。
作成したスクリプトの割り当て
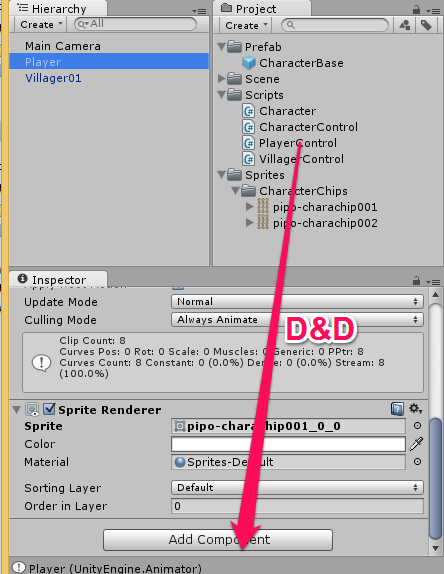
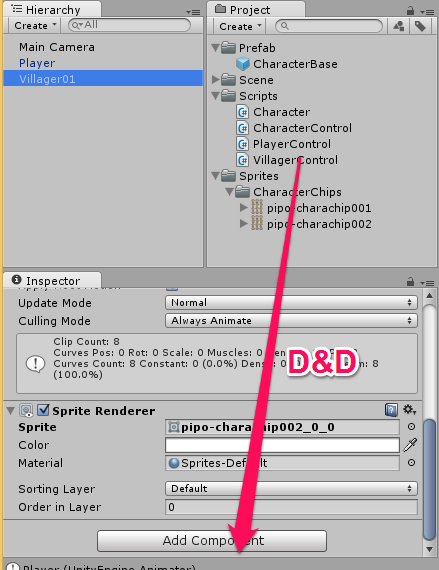
作成したスクリプトを割り当てます。PlayerオブジェクトにPlayerControl.csを

Villager01オブジェクトにVillager01オブジェクトを割り当てます。

割り当てたら、PlayerのSpeedを128、Villager01のSpeedを32にします。
ここまで出来ましたら、再生ボタンを押すと、村人が自動的に歩き出すと思います。カーソルキーを押すことで、Playerを操作できます。

今は当たり判定を付けていないので、お互いにすり抜けることが出来ます。
次回はフィールドマップの作成をする予定です。(行き詰まっているので、公開まで時間がかかるかも…)
Unityで2DRPGを作ってみる 2日目
昨日言い忘れましたが、まだあんまりUnityに詳しくないので、操作などの基本的な所は触れない予定です。
準備
さて、今日は実際にGameObjectとしてキャラクターを作っていきます。
昨日のスクリプトは、Scriptsフォルダに、Character.csとして保存しておきます。
まだ良く分かってないのですが、UnityEditor名前空間の機能を使う場合には、Editorフォルダに入れるのが作法っぽいです*1が、Editorフォルダに入れるとGameObjectに登録できないので、#if UNITY_EDITORディレクティブを使っています。正しいやり方かどうかはもう少し勉強する必要があります。
そして、キャラクター画像素材をSprites\CharacterChipsに入れておきます。
今回は、昨日紹介したぴぽやさんの、「RPGキャラ基本セット」に入っている、pipo-charachip001.pngを使います。

こんな感じになると思います。
GameObjectの作成
メニューバーの[GameObject]-[Create Empty]をクリックして、空のGameObjectを作成します。
このGameObjectを選択すると、Inspectorに詳細が表示されますので、ここに昨日作ったCharacterクラスを入れます。

そして、pipo-charachip001を、CharacterのImageとして登録します。
pipo-charachip001は、32x32のチップのセットなので、Crop WidthとCrop Heightにそれぞれ32と入れます。

こんな感じ。
次に、Characterクラスは、GameObjectのAnimatorとSpriteRendererを使いますので登録します。
Add Componentをクリックして、

出てきたメニューにAnimatorと入力して出てきた奴と、SpriteRendererと入力して出てきた奴を追加します。

次に、Main Cameraを設定します。HierarchyのMain Cameraをクリックし、InspectorでSizeを128ぐらいにします。Sizeの項目がない人は、多分ProjectionがPerspectiveになっていますので、Orthographicに変更してみてください。

さて、この時点で実行すると、一応、後ろ向きのキャラクターが表示されると思います。
しかし、まだインプットの設定をしていないので、動かすことは出来ません。

次回は、インプットの設定をしていきます。
*1:"UnityEditor" namespace not found... - Unity Answersに書いてある。間違っていたら教えて下さい
Unityで2DRPGを作ってみる
まだUnityを触り始めて日が浅い(1週間)ものの、勉強のログも兼ねてブログを始めてみる事にしました。
なにぶん、日本語の情報がまだまだ少ないので、少しでも人の役に立てば幸いです。
初心者なので間違っているところがあればご指摘頂けると勉強になります。
と言うことで、いきなり2DRPGを作り始めています。いきなりと言っても、公式のチュートリアルは一応やりました。
最近は結構、素材も無料で提供しておられる方が多いみたいで、今回は無料の素材を、ライセンスに気を付けながら使います。
今回使う素材
こんな素晴らしい素材を、無料で、ほぼ制限なしに配布されるのは凄いことですね。
キャラクター素材読み込み用のプレハブの作成
素材は、それぞれ目的のソフトウェアの規格に従って作られています。今回は、素材提供者の多い、ウディタ用の素材を使うので、ウディタの素材仕様に則った処理をするようにします。
WOLF RPGエディター公式サイト 【RPG作成フリーソフト】
スプライトの作成
Unity関連の記事などをみていると、画像をアセットとして登録したら、スライサーを使って分割し、アニメーションなどの設定をGUIから行っている例が多いです。
 もちろんこの方法でも良いと思いますが、2DRPGで、しかも素材の規格が既に決まっている場合には、沢山のキャラクターに対して、同じ設定をいくつもする必要があり、煩雑です。
そこでまずは、キャラクターとしての基本的な機能を持っている、Characterクラスを作成します。
このクラスは、登録された素材データを読み込み、内部で分割し、アニメーションの設定などをAwakeで行います。
/*
The MIT License (MIT)

Copyright (c) 2014 Kotonaga

Permission is hereby granted, free of charge, to any person obtaining a copy
of this software and associated documentation files (the "Software"), to deal
in the Software without restriction, including without limitation the rights
to use, copy, modify, merge, publish, distribute, sublicense, and/or sell
copies of the Software, and to permit persons to whom the Software is
furnished to do so, subject to the following conditions:

The above copyright notice and this permission notice shall be included in
all copies or substantial portions of the Software.

THE SOFTWARE IS PROVIDED "AS IS", WITHOUT WARRANTY OF ANY KIND, EXPRESS OR
IMPLIED, INCLUDING BUT NOT LIMITED TO THE WARRANTIES OF MERCHANTABILITY,
FITNESS FOR A PARTICULAR PURPOSE AND NONINFRINGEMENT. IN NO EVENT SHALL THE
AUTHORS OR COPYRIGHT HOLDERS BE LIABLE FOR ANY CLAIM, DAMAGES OR OTHER
LIABILITY, WHETHER IN AN ACTION OF CONTRACT, TORT OR OTHERWISE, ARISING FROM,
OUT OF OR IN CONNECTION WITH THE SOFTWARE OR THE USE OR OTHER DEALINGS IN
THE SOFTWARE.
*/

#if UNITY_EDITOR
using UnityEngine;
using UnityEditor;
using UnityEditorInternal;

[ExecuteInEditMode()]
public class Character : MonoBehaviour
{
    ///
    /// ウディタ用キャラクタ画像素材
    ///
    public Texture2D m_image;
    ///
    ///  1セルの幅
    ///
    public int m_cropWidth;
    ///
    /// 1セルの高さ
    ///
    public int m_cropHeight;

    void Awake ()
    {
        if(this.m_image==null)
            return;

        // スプライトレンダラの取得
        SpriteRenderer spriteRenderer = gameObject.GetComponent ();
        // アニメータの取得
        Animator animator = gameObject.GetComponent ();
        // ぼやけを除去
        this.m_image.filterMode = FilterMode.Point;

        // 15フレームに一回アニメーションする
        float frameLength = 15f / 60f;
        // 画像は横にアニメーションする
        int frameCount = this.m_image.width / this.m_cropWidth;
        // 画像は縦に種類が並んでいる
        int stateCount = this.m_image.height / this.m_cropHeight;
        bool extendedCharaChipSet = false;

        // ただし、8方向のチップセットが存在するので、それに対処する
        if(frameCount==6 || frameCount==10){
            frameCount >>= 1;
            stateCount <<= 1;
            extendedCharaChipSet = true;
        }

        // スプライト配列の作成
        Sprite[,] sprites = new Sprite[stateCount, frameCount];

        // アニメータコントローラの作成
        AnimatorController animatorController = new AnimatorController ();
        // 名前はテクスチャ名にする
        animatorController.name = this.m_image.name;
        //向きと状態指定用のパラメータを追加
        animatorController.AddParameter ("DirectionX", AnimatorControllerParameterType.Float);
        animatorController.AddParameter ("DirectionY", AnimatorControllerParameterType.Float);
        animatorController.AddParameter ("Walking", AnimatorControllerParameterType.Bool);

        // アニメータコントローラにベースレイヤを追加
        AnimatorControllerLayer animatorContorollerLayer = animatorController.AddLayer ("Base");
        // ステートマシンの取得
        StateMachine stateMachine = animatorContorollerLayer.stateMachine;

        // 歩き状態を追加する
        State walkState = stateMachine.AddState ("Walk");
        BlendTree walkBlendTree = walkState.CreateBlendTree ();
        walkBlendTree.name = "Blend Tree";

        // 歩き状態は歩く方向によってアニメーションが変化する
        walkBlendTree.blendType = BlendTreeType.SimpleDirectional2D;
        walkBlendTree.blendParameter = "DirectionX";
        walkBlendTree.blendParameterY = "DirectionY";

        // 状態の数だけループ
        for (int y=0; y=(stateCount>>1)){
                offsetX = frameCount;
                offsetY = -(stateCount>>1);
            }
            // スプライトの切り出しと普通のアニメーションの作成
            for (int x=0; x1枚目とアニメーションする
            for (int x=1; x>=0; x--)
            {
                int index = frameCount + 1 -x;
                keyFrames [index] = new ObjectReferenceKeyframe{time=index*frameLength, value=sprites[y,x]};
            }

            // アニメーションクリップの作成
            // 名前は状態のインデックスにする
            AnimationClip clip = new AnimationClip ();
            clip.name = y.ToString ();
            // はみ出た部分は消す
            clip.wrapMode = WrapMode.Clamp;
            // よくわかっていないがアニメーションのタイプを指定する
            AnimationUtility.SetAnimationType (clip, ModelImporterAnimationType.Generic);
            // カーブの作成
            EditorCurveBinding curveBinding = new EditorCurveBinding ();
            // ファイルは存在しない
            curveBinding.path = string.Empty;
            // スプライトをアニメーションするのでtypeにSpriteRenderer
            // propertyNameにはm_Spriteを指定
            curveBinding.type = typeof(SpriteRenderer);
            curveBinding.propertyName = "m_Sprite";
            // クリップとカーブにキーフレームをバインド
            AnimationUtility.SetObjectReferenceCurve (clip, curveBinding, keyFrames);
            // LoopTimeが直接設定出来ないので一旦シリアライズする
            SerializedObject serializedClip = new SerializedObject (clip);
            // アニメーションクリップ設定の取り出し
            AnimationClipSettings animationClipSettings = new AnimationClipSettings (serializedClip.FindProperty ("m_AnimationClipSettings"));
            // LoopTimeを有効にする
            animationClipSettings.LoopTime = true;
            // 設定を書き戻す
            serializedClip.ApplyModifiedProperties ();
            // 状態を歩き状態のブレンドツリーに追加
            walkBlendTree.AddAnimationClip (clip);
        }
        if(extendedCharaChipSet){
            // 上向き
            walkBlendTree.SetChildPosition (0, new Vector2 (0, 1));
            // 右向き
            walkBlendTree.SetChildPosition (1, new Vector2 (1, 0));
            // 左向き
            walkBlendTree.SetChildPosition (2, new Vector2 (-1, 0));
            // 下向き
            walkBlendTree.SetChildPosition (3, new Vector2 (0, -1));
            // 右上向き
            walkBlendTree.SetChildPosition (4, new Vector2 (1, 1));
            // 左上向き
            walkBlendTree.SetChildPosition (5, new Vector2 (-1, 1));
            // 右下向き
            walkBlendTree.SetChildPosition (6, new Vector2 (1, -1));
            // 左下向き
            walkBlendTree.SetChildPosition (7, new Vector2 (-1, -1));
        }else{
            // 上向き
            walkBlendTree.SetChildPosition (0, new Vector2 (0, 1));
            // 右向き
            walkBlendTree.SetChildPosition (1, new Vector2 (1, 0));
            // 左向き
            walkBlendTree.SetChildPosition (2, new Vector2 (-1, 0));
            // 下向き
            walkBlendTree.SetChildPosition (3, new Vector2 (0, -1));
        }

        // 止まり状態を追加する
        State waitState = stateMachine.AddState ("Wait");
        BlendTree waitBlendTree = waitState.CreateBlendTree ();
        waitBlendTree.name = "Blend Tree";

        // 止まり状態はアニメーションしないが
        // 方向によってスプライトが変化する
        waitBlendTree.blendType = BlendTreeType.SimpleDirectional2D;
        waitBlendTree.blendParameter = "DirectionX";
        waitBlendTree.blendParameterY = "DirectionY";

        // 状態の数だけループ
        for (int i=0; i歩きのトランジションを作成
        Transition waitToWalk = stateMachine.AddTransition (waitState, walkState);
        // 最初からExitTimeの条件が設定されているので、これを変更する
        AnimatorCondition waitToWalkCondition = waitToWalk.GetCondition (0);
        // Walkingフラグがtrueの時
        waitToWalkCondition.parameter = "Walking";
        waitToWalkCondition.mode = TransitionConditionMode.If; // Ifがtrue

        // 歩き->止まりのトランジションを作成
        Transition walkToWait = stateMachine.AddTransition (walkState, waitState);
        // 最初からExitTimeの条件が設定されているので、これを変更する
        AnimatorCondition walkToWaitCondition = walkToWait.GetCondition (0);
        // Walkingフラグがfalseの時
        walkToWaitCondition.parameter = "Walking";
        walkToWaitCondition.mode = TransitionConditionMode.IfNot; // Ifがfalse

        // アニメータコントローラに設定
        animator.runtimeAnimatorController = (animatorController as RuntimeAnimatorController);

        // とりあえず0,0のスプライトをデフォルトにセット
        spriteRenderer.sprite = sprites[0,0];
    }
}

///
/// AnimationClipSettingsの設定用クラス
///
class AnimationClipSettings
{
    SerializedProperty m_property;

    public AnimationClipSettings (SerializedProperty prop)
    {
        this.m_property = prop;
    }

    private SerializedProperty Get (string property)
    {
        return this.m_property.FindPropertyRelative (property);
    }

    public bool LoopTime
    {
        get
        {
            return this.Get ("m_LoopTime").boolValue;
        }
        set
        {
            this.Get ("m_LoopTime").boolValue = value;
        }
    }
}
#endif
AnimatorControllerLayerとかStateMachineとかをスクリプト側で生成する例が見つからなかったので、結構苦労しました。
とりあえず今日はここまで。明日はGameObjectの作成とスクリプトの登録をします。
あとはこのスクリプトを登録したGameObjectに素材の画像を登録すれば、勝手にアニメーションなどを生成します。便利ですね。